Real Estate Photography Tips That Actually Move Listings
I build websites and 3D property visualizations for real estate developers, agents, and architects. Photography is the visual raw material that almost every listing I touch depends on, and over the years I have watched a pattern repeat itself: technically excellent photos that underperform on the page, and rough-edged shots that convert well. The difference is rarely the camera. It is almost always the decisions that come before the shoot and what happens to the photos after the shutter closes.
Most real estate photography advice stays inside the frame: aperture, ISO, wide-angle lenses, HDR blending, post-processing. That is the easy part to look up and the least important part to get right. What actually moves a listing is how the photography serves the story the property is telling, how it lives inside the listing page, and how it compounds with the other visual assets a buyer will see on the way to making a viewing request.
A Redfin eye-tracking study found that buyers spend 60% of their time looking at the photos and only 20% on the written description and 20% on agent comments. VHT Studios' analysis of Chicago-area listings found that properties with professional photography sold 32% faster, 89 days on market compared to 123, and received 118% more online views than equivalent listings with weaker imagery. The NAR Profile of Home Buyers and Sellers consistently puts photos as the most useful feature on a listing website, ahead of detailed property information and floor plans. None of this is news to anyone selling property. What is less obvious is where photography starts earning that attention, and where it quietly loses it.
The hero image is a load-bearing decision
The first photo on a listing carries more weight than every other image combined. It is what appears in portal thumbnails, search result grids, social media previews, and the forwarded emails a buyer's agent sends. In most listing platforms, the hero image is all a buyer sees before deciding whether to click through. A strong gallery hidden behind a poorly chosen hero rarely recovers from that first impression.
From my side of this problem, building the property pages the hero image actually lands on, I see the same mistake constantly. Agents default to the front exterior shot because that is what the template has always shown first. For suburban single-family homes with real kerb appeal, that is fine. For a top-floor apartment, a new-build where the facade is unremarkable, or a property whose entire value proposition is the interior, the front shot buries the listing. A bright living room with its best angle, a kitchen opening onto a view, or a terrace shot often outperforms the exterior by a wide margin, measured in portal click-through rates.
The practical test I use when briefing a shoot: if you removed every photo from the gallery except the hero, would a buyer understand what is for sale and why they should care? If the answer is no, the hero is wrong. This single decision compounds with the rest of the property listing design more than any individual interior shot will.
Exterior photography, and why golden hour gets misused
Golden hour advice is everywhere and it is half right. The hour before sunset produces soft, warm, flattering light, but its usefulness depends entirely on which direction the facade you are shooting faces. A west-facing building photographed at golden hour looks magnificent. A north-facing building photographed at the same moment sits in flat shadow while the sky behind it burns out. Evening sun is not a universal cheat code; it is a tool with very specific geometry.
For buildings that face north or sit inside a dense urban grid where neighbouring buildings cut the light, twilight photography almost always outperforms golden-hour exteriors. Twilight is the twenty to thirty minutes after sunset, when interior lights are on and the sky still holds a deep blue. It hides imperfect facades, shows off interior warmth, and produces the only property photograph most buyers will describe as genuinely beautiful. It takes more planning than golden hour because the window is shorter and shot order has to be locked in advance, but for premium listings it earns its place in the schedule.
Aerial photography belongs in a similar category of conditional tools. Drone shots add real value when the property's context matters: a house with acreage, a beachfront plot, a development embedded in a distinctive neighbourhood, a long approach driveway. They add very little when the lot is ordinary and the shot only reveals roofs and the neighbours' gardens. If you want a deeper treatment of when drone photography earns its cost, I have a separate piece on real estate drone photography tips that goes into the specifics.
Interior photography that translates online
Interior real estate photography is almost entirely a problem of getting wide angle without the distortion that wide angle invites. Buyers need to read the room, how the kitchen flows into the dining area, how the master suite relates to the window wall, and that requires a lens wide enough to hold the whole scene. But a 14mm on a full-frame body bends vertical walls, pulls ceilings skyward, and makes a forty-square-metre living room look like a small gymnasium. When the buyer arrives in person, the room feels smaller than the photograph promised, and that first moment of disappointment becomes the emotional anchor for the entire viewing.
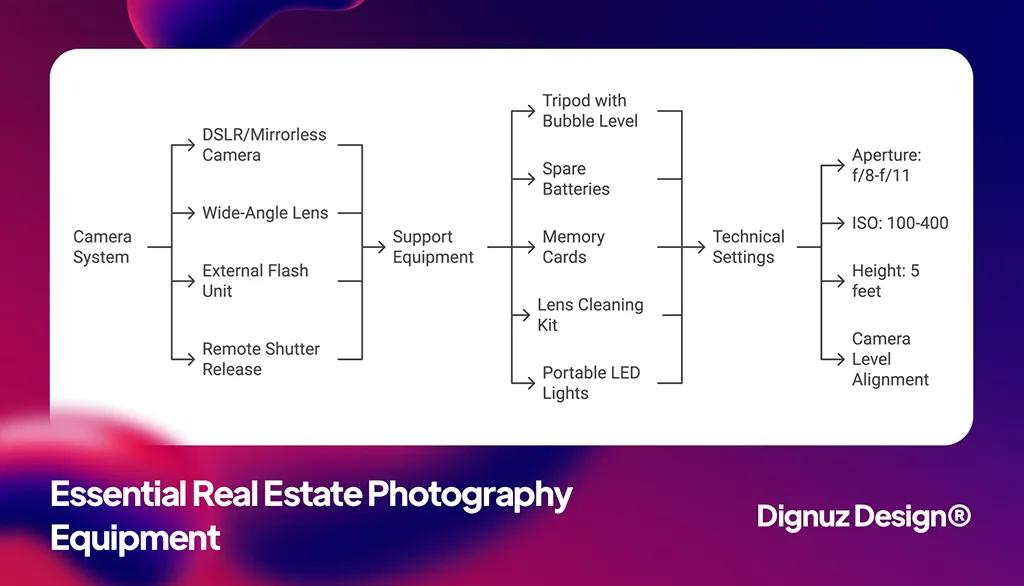
The range I have seen work most consistently is 18 to 24mm on full-frame, or the 10 to 16mm equivalent on APS-C. That is wide enough to hold a whole room from a single corner, tight enough to preserve the scale the buyer will experience in person. For camera height, five feet is the conventional rule; I have seen better results closer to four feet for kitchens and living rooms, where a lower camera makes the ceiling feel higher and the countertops more prominent.
Vertical lines are the detail most amateur shoots get wrong. If the walls lean inward at the top of the frame, the image reads as amateur on first glance even to viewers who cannot articulate the problem. Either get the sensor perfectly level with the horizon at the moment of capture, or correct it precisely in post. There is no middle ground that looks professional. Our real estate photography settings guide covers the specific aperture, ISO, and bracketing choices in more depth if you want the technical companion to this piece.
Lighting is a practical problem, not a studio exercise
The hardest lighting problem on every real estate shoot is the same one: the exterior is five stops brighter than the interior. Looking through a window, the human eye adapts so both sides appear normal. A camera sensor cannot. Either the interior is correctly exposed and the windows blow out to pure white, or the windows are correctly exposed and the interior sinks into shadow.
Three working solutions exist. The first is flambient or flash-balanced shooting, where off-camera flashes fill the interior until it matches the exterior exposure. This requires equipment, practice, and real time on location; most agents will not shoot this way unless they hire a specialist. The second is HDR bracketing, where three to five exposures are blended in post-processing. Done carefully it looks natural; done lazily it produces the over-cooked, halo-rimmed image that screams budget real estate and puts off serious buyers. The third, and the one I recommend to most agents, is manual exposure blending in Lightroom or Photoshop: one exposure for the interior, one for the window view, blended by hand with masks. It adds five minutes per image and the result is cleaner than any automated HDR algorithm I have seen.
Mixed colour temperature is the other persistent lighting problem. Tungsten bulbs read orange, daylight reads blue, LED fluorescents can read green, and most rooms have all three sources at once. The move I use is to switch off every interior light before shooting the daylight scene, so the only source is the windows, then shoot a second set with interior lights on for warmth. Blend or pick the best from each. Trying to white-balance a mixed-source scene in post always compromises one side or the other.
Preparation is 80% of the result
The most under-weighted advice in real estate photography is that the shoot itself is the small part. By the time the photographer arrives on site, most of what determines image quality has already happened or has already failed to happen. The property is either decluttered or it is not. The windows are either clean or they are streaked. The flowers on the dining table are either fresh or two days dead.
The highest-leverage preparation items, ranked by what I have seen actually change listing outcomes:
- Windows cleaned inside and out on the day of the shoot. Dirty windows dominate every photograph they appear in, especially in backlit rooms, and no amount of post-processing will rescue them economically.
- Kitchen and bathroom counters stripped back to the absolute minimum. One small decorative item per surface, at most. The kitchen counter is where buyers judge cleanliness and spaciousness simultaneously, and clutter reads as both dirty and cramped.
- All personal items removed. Family photographs, visible mail, medication bottles, toothbrushes, pet bowls, religious items. Buyers mentally subtract these from the space, so the image reads as cluttered even when it is not.
- Lawn mowed and the immediate exterior swept two days before the shoot, not on the day, so photographs do not show fresh mower track marks or sweep lines.
- Soft furnishings reset: cushions aligned, beds made to hotel standard, throws folded rather than draped. Small things that the eye never consciously registers but always quietly scores.
None of this is photography. All of it determines whether the photography can succeed. The original version of this article had an exhaustive per-room checklist; the condensed version above captures the five items that actually move the output.

💻 Let us help you create a stunning online showcase for your projects that works seamlessly across all devices. Ready to amplify your real estate business? 👉 Explore AmplyViewer now
Editing, and where honest stops
The line between correction and fabrication is an old debate in real estate photography and a live legal issue in several jurisdictions. In much of the EU, property advertising that misrepresents material features is actionable under consumer protection law. In the US, MLS rules vary by region but increasingly prohibit sky replacement, virtual staging without disclosure, and the removal of permanent features.
The defensible edits are straightforward: exposure correction, white balance adjustment, lens distortion and perspective correction, minor distraction removal (a bin, a visible cable, a photographer's reflection), and mild saturation adjustments. These bring the photograph closer to what a person standing in the room would actually perceive.
The edits that backfire, and I have seen these end listings badly, are sky replacement, virtual grass swaps, the removal of permanent fixtures, and wall colour changes. The buyer arrives in person, notices the discrepancy within thirty seconds, and the whole listing loses credibility along with the agent who presented it. If a feature is genuinely removable before the shoot, remove it physically. If it is permanent, photograph it honestly. If you want to show what a renovation or interior redesign could look like, commission a render and label it clearly as a visualization; that is a different product and worth learning more about in our guide to 3D real estate rendering services if you regularly sell properties with untapped potential.
Where photography ends and the rest of the marketing system begins
This is the section most photography guides skip, and it is the one that matters most in practice. Photos do not live alone on a listing page. They sit next to floor plans, virtual tours, videos, and increasingly, interactive 3D walk-throughs. How these assets sequence and reinforce each other determines whether the photography you just paid for earns its keep or gets drowned.
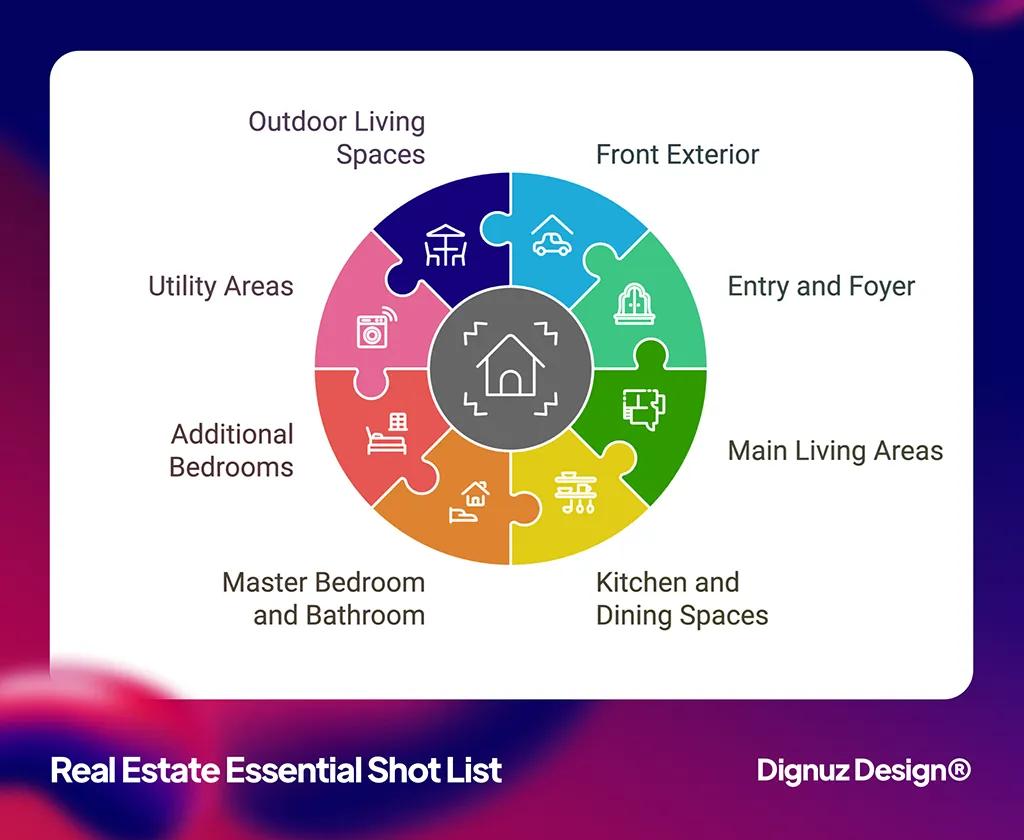
On the listing pages I build, the sequence that converts best is: a single strong hero image, five to eight interior photos that establish the main rooms in the order a visitor would walk through them, then the floor plan, then the 3D tour or interactive viewer if the property warrants it, then supporting exterior and detail shots. Burying the floor plan at position twenty is a mistake I see constantly. Buyers want to orient themselves early, and a floor plan does that job better than any single interior shot can.
For new builds and off-plan developments, photography is not the right tool at all because there is nothing built yet. This is where we use 3D rendering through Faraday3D and interactive property viewers through AmplyViewer. The underlying principles hold across both mediums. A render needs the same scale discipline as a photo, the same lighting honesty, the same sequencing logic on the page. The technology changes, the craft does not. And on completed properties where the owner wants buyers to experience the space before visiting, pairing strong photography with an immersive 3D walkthrough roughly doubles the page engagement time I see on client analytics.
Two system-level details worth flagging before we close. First, image file size and format matter more than most photography guides admit. I have watched beautifully shot galleries sink a listing page's mobile load time, and mobile is where most first impressions now happen. Every image should be served as AVIF or WebP with a JPEG fallback, progressively loaded, and sized to the display width. If your developer is not doing this, ask why. Our website speed optimization guide covers the specifics. Second, brand consistency across listings matters more than any individual shoot. If your listings show ten different photographers' styles side by side, your brand looks rented rather than owned. A documented shot list and a post-processing style guide, shared with every photographer you commission, produces the visual coherence that separates a serious real estate business from an ad-hoc one.
Frequently asked questions
How many photos should a property listing include?
For most properties, twenty to twenty-five high-quality images. Fewer than fifteen signals an under-prepared listing; more than thirty starts to bury the strong shots under repetitive ones. The exact count depends on the property's size and feature set. A studio apartment with one standout view needs eight great photos, not twenty mediocre ones. A luxury villa with grounds, guest quarters, and distinctive architecture can justify forty. Quality and sequencing matter far more than the total number.
What is the single biggest mistake amateur real estate photography makes?
Tilted verticals. The walls lean inward, the camera is not level with the horizon, and even viewers who cannot name the problem read the photograph as unprofessional in under a second. Fix this before you worry about aperture, HDR, or lighting. Every tripod has a bubble level and most modern cameras have a digital one on the rear screen. Use them on every shot.
Is drone photography worth it for standard suburban homes?
Usually no. Drone shots justify their cost when the property's context adds value, for example acreage, beachfront, a distinctive neighbourhood setting, or a long approach driveway. For a standard lot between two other standard lots, the aerial view mostly shows roofs and neighbours' gardens and does not earn attention. Spend the budget on twilight exteriors, stronger interior lighting, or a proper shot list instead.
Should I use HDR or avoid it?
Use manual exposure blending rather than automated HDR. Automated HDR tends to produce the over-processed look that buyers associate with budget listings: haloed window frames, unnaturally bright shadows, the image reading as slightly wrong even when the viewer cannot explain why. Manual exposure blending, typically two or three brackets masked by hand, gives you the dynamic range without the visual tell. If you insist on using HDR software, dial every slider back until the result looks like a photograph rather than an illustration.
How do photos for luxury properties differ from standard listings?
The standard rises at every step. Wider tolerance on file size and gallery length, more twilight and lifestyle photography, more detail shots of materials and craftsmanship, and a heavier emphasis on mood over comprehensive coverage. Luxury buyers browse more slowly and reward distinctive imagery; they also penalize generic real estate photography harder than mid-market buyers do. We cover this segment specifically in our guide to luxury real estate marketing.
Can AI-generated or AI-enhanced photos be used in listings?
AI-enhanced edits for routine tasks, like denoising, perspective correction, and clean-up of minor distractions, are becoming standard and are fine to use without disclosure. AI-generated rooms, AI-replaced skies, and AI virtual staging cross into disclosure territory and, in several markets, legal liability if left undisclosed. If you are using AI to materially alter what the property actually looks like, disclose it in the listing clearly. The downside of being caught misrepresenting a property is disproportionate to any short-term benefit from the edit.
Closing thought
Good real estate photography is not a function of the camera. It is the product of every decision that surrounds the shoot: what you are trying to sell, which room tells that story, how the light behaves on that specific facade, how the images will be sequenced on the listing page, and what other visual assets they will compound with. The technical settings in every generic photography guide matter less than any one of those. The next time you brief a photographer, or stand behind the camera yourself, the question worth answering first is not "what settings do I need?" but "what am I trying to make a buyer feel in the three seconds before they click?"