Real Estate Drone Photography Tips for Stronger Listings
I run a small studio called DignuzDesign that builds custom websites for property developers, architects, and estate agents. The work means I sit in the analytics of dozens of live listing pages every month and see exactly which images buyers linger on, which they skip, and which ones make them pick up the phone. Aerial shots are a recurring pattern in that data: when they are good, they outperform almost every interior photo on the page. When they are bad, they look like decoration that nobody scrolls past.
This piece is about the gap between those two outcomes. It is the article I wish a junior photographer or a first-time listing agent had when they ordered their first drone shoot for me.
What a drone shot is actually for in a property listing
The first useful idea is to stop thinking of the aerial photo as a "wow shot" and start treating it as the listing's spatial context shot. Ground photos sell rooms. Floor plans sell layout. Interior virtual tours sell flow. Only the drone shot can answer the question buyers quietly ask before they ever pick up the phone: what is this property actually surrounded by?
That question covers more than people realise. A buyer is reading for the distance to the nearest power line, the size of the back garden in relation to the neighbours, whether the lake view in the description is genuine or technically true at twenty degrees off-axis, where the road sits relative to the master bedroom, and whether the "private estate" is really separated from the next plot. The right aerial photo settles those questions in one frame. The wrong one is just a pretty top-down picture of a roof.
The National Association of Realtors notes that drone photography is now used by more than half of practising agents and that listings shown with aerial imagery are markedly more likely to sell. The data is real. It is also a trap, because the average shoot tries to capture twenty generic aerials and ends up using two of them. The studios I work with that get real value from drones plan two or three deliberate frames and shoot those properly.
Planning a shoot that produces usable listing shots
The fastest way to waste a flight is to launch the drone and figure out the shots in the air. Battery time vanishes, the light moves, and you end up with thirty mediocre frames and no anchor image to put at the top of the listing page.
The pre-flight conversation I want to see between agent and operator is short and specific. Which three questions about location does this property need its aerial frame to answer? On a coastal house, that might be the relationship to the shore, the privacy of the plot, and the access from the road. On an urban townhouse, it might be the rear garden depth, the view corridor from the upper floors, and proximity to a park. Pick the questions first, then pick the angles that answer them.
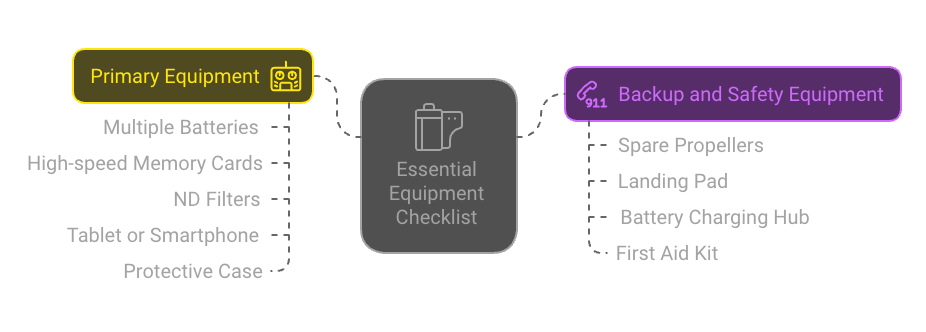
Once the shot list exists, the actual preparation is unglamorous and worth doing properly. I want to see fully charged batteries (three minimum for a one-property job), a memory card with verified write speeds, ND filters appropriate to the expected light, current firmware on both the aircraft and the controller, and a calibrated compass at the launch point. The pre-flight is also when you check that the property and its surroundings sit inside legal flying airspace, not after the drone is in the air.
This is also the right moment to align with the listing's other visual assets. If the property is also going to be shot with a ground photographer and produced as an interactive 3D viewer like AmplyViewer, the drone shoot should be planned to complement, not duplicate, those views. The aerial owns context. The 3D owns interior flow. Friction between the two appears when both try to be the hero image on the listing page.
The conditions that decide the shoot before takeoff
Most aerial frames are made or lost by light and weather, not by camera settings. A mid-tier drone in golden hour will outshoot a flagship aircraft at noon, every time.
The first hour after sunrise is the most underused window in property photography. Wind is usually calmest, light is warm and directional, glare on water and glass is manageable, and ambient activity on neighbouring streets is minimal so you are less likely to fly over uninvolved people. Late afternoon light is almost as good but tends to come with thermal turbulence and more reflective glare on windows, which matters more than it sounds when you are trying to capture a property with a lot of glazing.
The conditions I actively avoid for property work are flat midday light with the sun directly overhead, wind gusts above twelve knots regardless of the drone's rated wind tolerance (the aircraft can fly through it, but your stills will show vibration on close inspection), and high-contrast overcast where the sky burns out white. Bright but lightly clouded skies are usually fine and sometimes preferable because they soften the shadow on the roof line.
Seasonal planning matters more for property work than it does in other genres. Winter shoots flatter compact city plots because bare trees expose the building, but they expose lawn condition and unfinished landscaping mercilessly. Summer shoots flatter mature gardens and pool properties but punish darker roof materials and complicate flight planning around lush tree lines. None of this is theoretical. It is the difference between a listing image that supports the asking price and one that quietly subtracts from it.

💻 Let us help you create a stunning online showcase for your projects that works seamlessly across all devices. Ready to amplify your real estate business? 👉 Explore AmplyViewer now
Settings that matter when the subject is a property
The standard photography settings guides apply, but property work narrows the priority list. The frame has to be sharp from corner to corner because buyers will pinch-zoom on a phone, the colour has to be honest because misleading edits create a tangible disappointment when buyers arrive in person, and the dynamic range has to hold both the sky and the shaded side of the building.
In practice that means shooting RAW (always, no exceptions for paid work), keeping ISO at base, using a small enough aperture to keep the whole property in focus without diffracting, and using ND filters in daylight so shutter speed sits in a range that produces a clean result on stills and natural motion on video. Auto white balance can stay if you trust your editor, but a manual white balance reference taken on the ground avoids hours of guessing later when half the shots are at sunset and half at full sun. The same logic about base ISO, RAW capture, and conservative exposure applies to ground-based property photography, and consistency between the two pays back in editing time.
The other unsung setting is image format aspect. A listing platform typically crops to a 3:2 or 4:3 frame, while your social channels want 16:9 horizontal and 9:16 vertical. Composing the original shot wide enough to survive those crops without cutting the building or the relevant context is a habit, not a setting, and one most operators learn the hard way.
Composition designed around a property, not around the drone
Composition advice in generic photography guides talks about leading lines and rule of thirds as if they exist in isolation. They do not. On a listing page, composition is the difference between a frame that does its job and a frame that has to be explained in the caption.
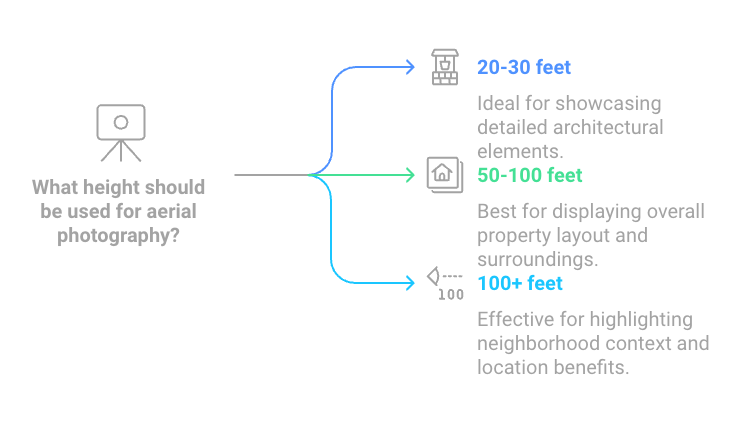
Three altitudes do almost all the useful work. A low aerial at roughly six to ten metres above ground separates the building from its plot and shows roof detail, terraces, and any rear extension. A mid aerial at thirty to forty metres places the property in its immediate context, with the garden, drive, and neighbouring properties readable in the same frame. A higher contextual frame at eighty to one hundred metres tells the location story: this is the relationship to the coast, the park, the school, or the city skyline. Anything higher than that on a residential listing tends to read as a satellite view and stops feeling like real estate.
Angle matters too. The single biggest composition mistake I see on listing pages is the dead-vertical top-down shot used as the hero. It looks tidy in the editing software and conveys almost nothing about the property as a building. Buyers do not buy roof plans. Tilt the camera between twenty and forty-five degrees and the property reads as architecture, with mass, shadow, and proportion. Save the true overhead for site-plan-style supporting frames or for sites where the geometry is the story, like a circular driveway or a courtyard layout.
Some patterns I keep returning to for different property types:
- For estates and rural homes, a slightly elevated wide angle from the approach road sells the arrival sequence better than any orbit shot, because it puts the viewer in the buyer's position as they would experience it on a viewing.
- For urban townhouses, a frame that brings the rear garden into the foreground with the city skyline in the background does more for the listing than any front elevation, which is usually already visible on the street view.
- For developments with multiple units, a single hero context frame plus tight low aerials of each unit type beat thirty generic site photos that all show the same scheme from minor variations of the same angle.
- For coastal or waterfront properties, the most valuable frame is the one that proves the view is genuine, taken from roughly the height of the master bedroom window pointing toward the water.
That is the only bullet list in this article on purpose. Real estate photography is not a checklist exercise. The thinking has to be applied to the specific property in front of you, and the better operators treat their delivery as a small set of considered marketing visuals rather than a dump of every angle the drone could reach.
Editing that holds up against the property in person
Post-processing is where listings either keep their credibility or lose it. The rule I work to is simple: an edit is acceptable if a buyer arriving in person would not feel misled by it.
That allows a fair amount of work. White balance correction, exposure recovery in shadow areas, perspective correction for slight drone tilt, dust removal, lens distortion correction, and modest saturation lifts on a flat grey sky are all defensible. Selective sharpening on architectural lines is fine. Reducing noise in dark roof areas is fine.
What it does not allow is bluer skies than the sky has ever been on that street, lawn green that no lawn has ever achieved, replacement skies dragged in from a different region, removal of permanent features like power lines or neighbouring sheds that the buyer will see on arrival, or HDR processing so aggressive that the building gains a halo. These edits do not just risk a misrepresentation complaint. They actively reduce conversion because the gap between the listing image and the in-person viewing erodes trust in the agent. Buyers are now visually literate enough to spot the obvious sky replacement at a glance, especially in the luxury segment where presentation expectations run high.
The compositional decisions you made in the air should be respected in the edit. If you tilted the camera at thirty-five degrees to give the building mass, do not flatten that with a perspective transform in post just to make the rooflines straight. Architecture is supposed to have presence.
The legal layer most operators learn the wrong way
The legal side of drone work in the United States is more settled than online discussion suggests. Any commercial flight, including any flight where the photos will be used to market a property for sale or rent, falls under FAA Part 107. The pilot must hold a Remote Pilot Certificate, the aircraft must be registered, and the flight must obey the operational limits in Part 107. Those limits include daylight or civil twilight operation with anti-collision lighting, a maximum altitude of four hundred feet above ground level or above a structure, visual line of sight, and no flight directly over people who are not part of the operation. Waivers exist for several of these and are granted routinely for properly written applications.
The other recent change every operator needs to know is Remote ID, which is now required on virtually all drones operated under Part 107. Either the aircraft broadcasts its identification natively, or a retrofit broadcast module is attached. Older aircraft without either are no longer compliant for commercial work, and this catches operators who built their kit before the rule came in.
Internationally the rules vary significantly. The European Union framework under EASA is structured around open, specific, and certified categories, the United Kingdom uses its CAA framework, and most jurisdictions require some form of operator registration even for relatively small aircraft. The practical answer is to check the specific country and region every time and to never assume that a US compliant setup is automatically legal abroad.
Insurance is the layer that gets forgotten. A liability policy that covers commercial drone operation is inexpensive and a non-negotiable condition for working with serious agencies. Most national associations also publish guidance on contracts and copyright assignments that are worth using.
Where aerial fits in the listing visual stack
Aerial photography is not a standalone product. It is one component of a property's visual presentation, and treating it that way is what separates listings that perform from listings that just have pictures.
In the workflow I see across the agencies and developers I build websites for, the visual stack now typically runs through ground photography for the building itself, drone work for site and context, interactive 3D tours or interior virtual walkthroughs for layout, and increasingly 3D renders and virtual visualisations from a studio like Faraday3D for properties that are off-plan, mid-construction, or that need to show furnishing options. Each layer does a specific job. The drone layer is the only one that can answer location and context questions, which is why it tends to be the highest-engaged image on a well-built listing page designed for conversion.
For developers selling unbuilt schemes, the aerial frame plays a slightly different role: it locates the future building inside the existing fabric, and a render takes over for the building itself. That handover from real aerial photography to architectural visualisation is where a lot of marketing materials look unconvincing, and the fix is usually to align the drone camera's height and lens to the renderer's virtual camera so the two frames feel continuous. It is a small detail and an obvious one only once you see it done well.
Frequently asked questions
Do I need an FAA Part 107 license to shoot drone photos for a real estate listing?
Yes. In the United States, any flight in support of a property being marketed for sale or rent is a commercial operation under FAA rules, and the operator must hold a Remote Pilot Certificate. This applies even if the photos are unpaid, given to the agent as a favour, or shot by the property owner themselves, because the photos serve a commercial purpose. The certificate is straightforward to obtain and is renewed every two years through online training.
How many drone photos does a typical residential listing actually need?
For most listings, between three and six aerial frames is the right answer, not the twenty-shot gallery many operators deliver. One hero context shot, one or two mid-altitude frames that show the property in its plot, and one or two supporting frames for specific features like the garden, pool, or view are usually enough. More than that and the listing's aerial section starts to feel like padding rather than information.
Should I shoot still photos or video for a property listing, or both?
Both, but they serve different parts of the funnel. Stills do the work on the main listing platform and in printed materials, where attention is short and the platform tends to feature a single hero image. Video is where social channels live, and a thirty to sixty second aerial reveal cut tight to the building's best angle consistently outperforms long establishing flyovers on every platform we have tested.
What is the realistic budget for professional drone photography on a listing?
In most US markets a competent residential drone shoot with three to six delivered edited stills sits between two hundred and five hundred dollars, with luxury and large-estate work running higher because the flight planning and editing time increase. For developments and commercial properties, expect a half or full day rate plus deliverables. Cheap drone work exists and is usually visibly cheap on the listing page, which is the wrong place to economise.
Will drone photography help a property in a dense urban area, or only large rural ones?
It helps urban properties differently. In a city, the aerial frame's job shifts from showing the size of the plot to showing the view corridor, the proximity to amenities, and the quality of the immediate streetscape. For apartments in particular, a drone shot taken at the height of the unit's actual windows is worth more than any rooftop overview, because it proves what the buyer will actually see from their living room.
Can interior 3D tours replace drone shots, or do I still need both?
They do different jobs and do not substitute for one another. Interior tours sell flow and layout, which photographs and floor plans struggle with. Aerial photography sells context and location, which interior tours cannot show. A listing that uses both, alongside competent ground photography, currently outperforms listings that lean heavily on a single visual format.
Closing thought
The drone is the easiest part of aerial real estate photography now. The aircraft is competent out of the box, the legal framework is settled, and the editing software is mature. What remains hard is the thinking. Which two or three frames does this specific property need, what do those frames have to prove to a buyer, and how do they sit alongside the rest of the listing's visual story.
Get that right and the aerials earn their slot on the page. Get it wrong and you have a folder of pretty photographs nobody scrolls to.